FAQ
General (12)
In the vast majority of cases this process is fully automated and does not require any user actions. Once a QR sticker is onboarded to a vehicle, our system automatically matches it to its corresponding Vehicle Detail Page.
If for some reason that match does not occur, you can manually associate the VDP via our web portal. Please follow the steps below for this process:
In your browser (Google Chrome or Microsoft Edge are preferred) visit api.goidit.co and log in with your account.
Next, click on Manually Enter VDP URLs from the menu.
On the next page, locate the vehicle by VIN or Stock#. In the entry field to the right you can then paste the URL for the vehicle’s VDP.
When done, click the Save URLs button to complete the association process.
In most cases, simply remove the QR sticker and you are done. goIDit regularly syncs with your inventory information and will automatically detect that the vehicle is no longer in your inventory. No additional steps needed!
Onboarding of QRs is an easy process conducted using the goIDit mobile app.
Please see the instructions in the corresponding FAQ in the Mobile App category below.
You can very easily request more stickers via our web portal:
In your browser (Google Chrome or Microsoft Edge are preferred) visit api.goidit.co and log in with your account. You can also get there from our website via the Portal button:
Next, select Order QR Codes in the top panel.
Complete and submit the order form.
Once submitted, goIDit will be notified of the order and QR Codes will be shipped to the submitted shipping address.
You can also contact our sales team via email at contact@goidit.com or by calling our sales team at 402-253-0077.
Absolutely! We fully support to communicate your brand, your message! We therefore encourage you to talk to our team to assist with the QR Sticker design that is best for you! We can interface you with a design team, or assist your team in designing their own. Our print provider supports a number of different QR Stickers sizes, but for most designs we recommend a 4″x6″ size. This size is suitable to include the QR Code itself, your brand message, and information your would like to convey to your shoppers, such as warranty information, incentives, etc.
Our usual process for custom QRs includes a review by our in-house design team to ensure that the design is suitable for our QR solution, and a review by our printer to ensure it follows print guidelines. For more information please contact us! We are happy to help!
Virtually all smart phones manufactured over the last several years fully support QR Codes without any need for additional software. iPhones and Android device users can simply scan them using their regular camera app.
The vast majority of smartphone users are familiar with how to scan QR codes, as they have become ubiquitous for accessing information easily and quickly.
Customers simply open their camera app and point the camera at the QR Code. The camera app recognizes the QR code in the image automatically and displays a popup – either at the top or bottom of the screen. The customer simply clicks on the popup to follow the link and visit the Vehicle Detail Page (VDP) for that vehicle.
goIDit also can provide your dealership with posters and rack cards that explain this process and advertise to your customers that the goIDit solution is available at your dealership for their convenience. Furthermore, you can also customize the QR sticker design to include information such as warranty offers or instructions on how to use the QR codes.
More information on custom QR designs can be found in this FAQ.
You can also contact our sales team via email at contact@goidit.com or by calling our sales team at 402-253-0077.
For most regular user accounts the answer is yes!
But there are specific user roles that are only permitted to use either the app or the web portal. If you encounter any difficulties logging in, please contact your supervisor or goIDit support.
The goIDit web portal allows the user to perform many different operations. However, the available functionality depends on the user role of the logged in user. You will only see the options available to you for your specific set of responsibilities.
Some of the available functions include:
- User and Account Management
- QR Sticker Ordering
- VDP Page Mapping
- Inventory Review
- and much more!
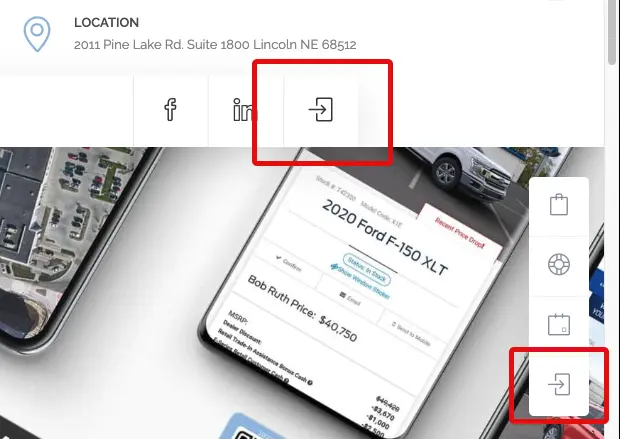
Yes, absolutely! In addition to our mobile app, we also created a convenient web app. You can log into our web portal using the portal icon on our webpage from the menu and the sidebar:
You can also reach it directly by going to api.goidit.co.
Once there, simply log in using your account and you can access all activities relevant to your account’s user role!
Only administrators are allowed to change a user’s assigned user role. If you feel that you should have been assigned a different user role, please contact your supervisor or goIDit support.
Any change to a user’s role requires that the user log out and log back into the app in order for the new role to take effect within the app. Similarly, if you are using our web portal, you will also need to log out and log back in, in order for the change to become active.
Note: This task can only be performed by dealership account administrators or goIDit personnel.
User accounts can only be edited or removed using our web portal:
In your browser (Google Chrome or Microsoft Edge are preferred) visit api.goidit.co and log in with your account. You can also get there from our website via the Portal button:
Next, click on Settings at the top right of the webpage in the navigation bar:
From the settings page select the Users option:
The page that appears provides a summary of all existing users.
To edit a user, select the Edit button (pencil icon) to the left of the User’s information. Edit any desired user account details and then press “Save User”.

If you have permissions to delete a user, select the Delete button (trash icon) to the right of the User’s information.
Warning: Deleting a user’s account is immediate and cannot be undone. A new user would have to be created to restore that user’s access. Deleting an account also deletes any stored user preferences.
Note: This task can only be performed by dealership account administrators or goIDit personnel.
User accounts can be created using our web portal:
In your browser (Google Chrome or Microsoft Edge are preferred) visit api.goidit.co and log in with your account. You can also get there from our website via the Portal button:
Next, click on Settings at the top right of the webpage in the navigation bar:
From the settings page select the Users option:
The page that appears provides a summary of all existing users.
From the top select the “New” button.
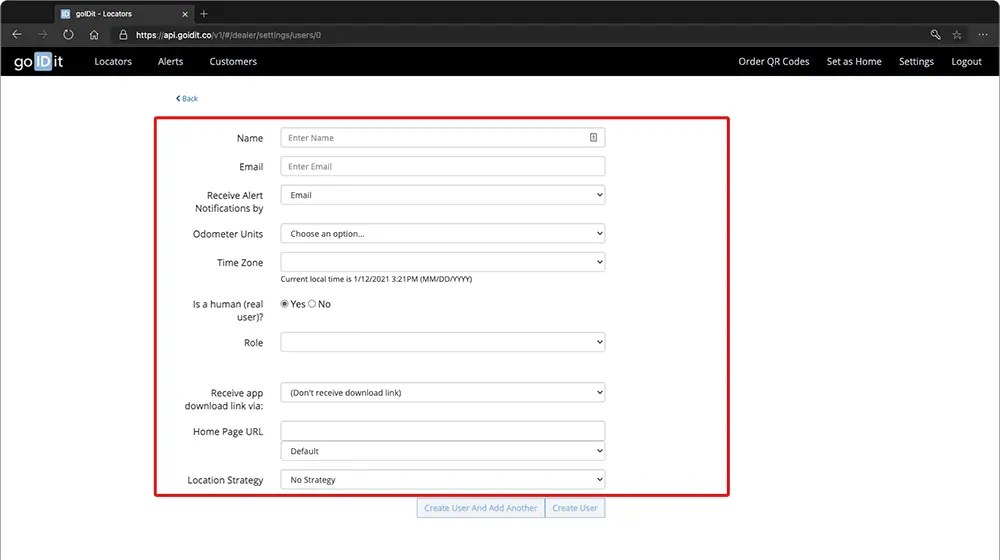
On the next page, enter the user’s name, email address, role, etc. into the appropriate fields. Note that the email address will be used as the account’s username, as well as for password recovery operations. We recommend to use dealership email addresses instead of private addresses.
Press “Create User” to save/exit or press “Create User And Add Another” to add additional users.
QR Stickers and VDP (11)
Any time a vehicle is moved, assuming that you also use the QR Stickers to track vehicle location, simply open the app and activescan the QR after parking the vehicle. This will ensure that after a vehicle moves our system is informed of the new location. Please also see the instructions on the activescan process for updating the location associated with a QR in this FAQ.
We call this process “activescan”. Activescanning is easily performed via the goIDit app.
Once logged in you can find a button for the activescan feature on the main screen of the app:
You can also access it via the Profile -> Utilities page.
Once you entered activescan, if you want to utilize QRs please click the Scan Asset QR button at the bottom left of the screen to scan the QR you want to update.
The app automatically updates the QR’s location to your phone or tablet’s current location. After completing an activescan using the QR scanner successfully, the app will once again engage the QR scanner to indicate that it is ready to proceed with the scan of the next QR.
Scan each QR sticker you want to update and activescan will take care of the rest.
In the vast majority of cases this process is fully automated and does not require any user actions. Once a QR sticker is onboarded to a vehicle, our system automatically matches it to its corresponding Vehicle Detail Page.
If for some reason that match does not occur, you can manually associate the VDP via our web portal. Please follow the steps below for this process:
In your browser (Google Chrome or Microsoft Edge are preferred) visit api.goidit.co and log in with your account.
Next, click on Manually Enter VDP URLs from the menu.
On the next page, locate the vehicle by VIN or Stock#. In the entry field to the right you can then paste the URL for the vehicle’s VDP.
When done, click the Save URLs button to complete the association process.
For virtually all goIDit customers, onboarding a QR and placing it on a vehicle is all that is required.
When the onboard completes, it also associates the new QR with the current location of the device used to perform the onboarding. Please make sure to conduct the onboard process next to the vehicle to ensure that a correct initial location is assigned to the vehicle.
Our cloud service will automatically associate the VDP for this vehicle with the QR. No additional actions required!
goIDit recommends that QR Stickers are placed near your existing window stickers.
Today, customers are familiar with the process of reviewing a window sticker to see details and MSRP. They’ll be thrilled to have the option to view online pricing, additional details, and engage with your staff simply by utilizing the goIDit Consumer Engagement – QR Code Solution.
You can also contact our sales team via email at contact@goidit.com or by calling our sales team at 402-253-0077.
Please reach out to our team to discuss a solution that best fits your needs. We are here to help!
Onboarding of QRs is an easy process conducted using the goIDit mobile app.
Please see the instructions in the corresponding FAQ in the Mobile App category below.
First of all, you need to have our app installed:
Our app can be downloaded from the iOS App Store or the Google Play Store. Find the links to the corresponding app stores below:
Next, you need to log into the app. From there, you can easily reach the onboarding screen using the onboarding button next to the Search bar on the Inventory tab. The button appears as follows:
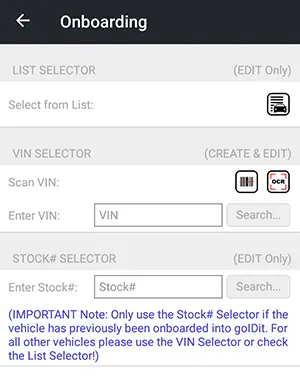
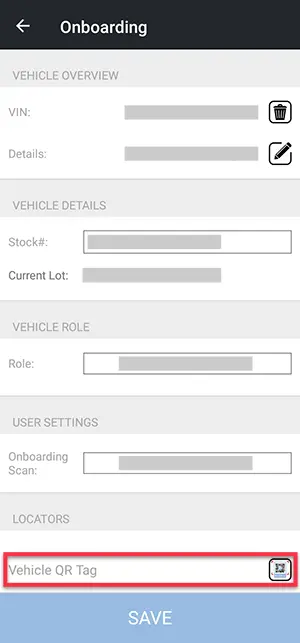
On the onboarding page you first select the vehicle to onboard. This can be accomplished via VIN or Stock#. The VIN can be manually entered, selected from the list of vehicles that are automatically imported into goIDit from your dealership, or by using the camera to perform Optical Character Recognition (OCR) of the VIN found, for example, on the vehicle sticker on the driver door frame or visible through the windshield. For most vehicles the door frame sticker is the better option for VIN OCR.
Once a vehicle is selected a new screen will appear where the onboarder can enter or edit vehicle information such as make, model, year, color, etc.
At the bottom of this page the user can also find the area for onboarding a QR code. Click the button to scan the QR. It will then be added to the vehicle.
Complete the process using the Save button at the bottom of the screen. All vehicle changes will be communicated to our service and onboarding is completed.
You can very easily request more stickers via our web portal:
In your browser (Google Chrome or Microsoft Edge are preferred) visit api.goidit.co and log in with your account. You can also get there from our website via the Portal button:
Next, select Order QR Codes in the top panel.
Complete and submit the order form.
Once submitted, goIDit will be notified of the order and QR Codes will be shipped to the submitted shipping address.
You can also contact our sales team via email at contact@goidit.com or by calling our sales team at 402-253-0077.
Follow the instructions for onboarding stickers to vehicles. Your dealership inventory should already be available in our system to simplify the onboarding process.
Onboarding itself is a simple and straightforward process. It basically involves linking each sticker to the corresponding vehicle and then affixing the sticker to that vehicle.
Absolutely! We fully support to communicate your brand, your message! We therefore encourage you to talk to our team to assist with the QR Sticker design that is best for you! We can interface you with a design team, or assist your team in designing their own. Our print provider supports a number of different QR Stickers sizes, but for most designs we recommend a 4″x6″ size. This size is suitable to include the QR Code itself, your brand message, and information your would like to convey to your shoppers, such as warranty information, incentives, etc.
Our usual process for custom QRs includes a review by our in-house design team to ensure that the design is suitable for our QR solution, and a review by our printer to ensure it follows print guidelines. For more information please contact us! We are happy to help!
Virtually all smart phones manufactured over the last several years fully support QR Codes without any need for additional software. iPhones and Android device users can simply scan them using their regular camera app.
The vast majority of smartphone users are familiar with how to scan QR codes, as they have become ubiquitous for accessing information easily and quickly.
Customers simply open their camera app and point the camera at the QR Code. The camera app recognizes the QR code in the image automatically and displays a popup – either at the top or bottom of the screen. The customer simply clicks on the popup to follow the link and visit the Vehicle Detail Page (VDP) for that vehicle.
goIDit also can provide your dealership with posters and rack cards that explain this process and advertise to your customers that the goIDit solution is available at your dealership for their convenience. Furthermore, you can also customize the QR sticker design to include information such as warranty offers or instructions on how to use the QR codes.
More information on custom QR designs can be found in this FAQ.
You can also contact our sales team via email at contact@goidit.com or by calling our sales team at 402-253-0077.
Mobile App (11)
If you have not already done so, please first install our app.
Our app can be downloaded from the iOS App Store or the Google Play Store. Find the links to the corresponding app stores below:
If you are a shopper visiting a goIDit-enabled dealership:
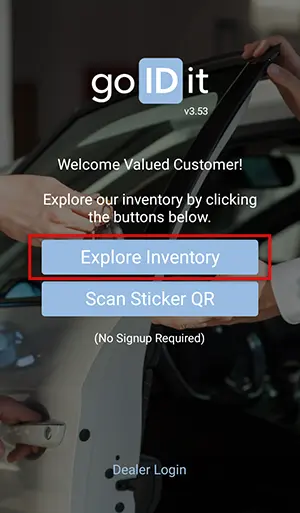
The goIDit app features a public component that allows you to easily browse a dealership’s inventory and find vehicles you are interested in. After opening the app, simply click the “Explore Inventory” button. The app will utilize your location to determine which dealership you are currently at and then load the inventory.
From the inventory screen you can select a vehicle from the list to see its location. You can also use the search function at the top of the screen to view only vehicles of interest. The search function considers make, model, year, etc. Simply enter all or parts of what you are interested in and the list will update automatically.
If you have a login to goIDit:
Login to the goIDit app. The primary screen you will see after the login completes is the Inventory page.
From the inventory screen you can select a vehicle from the list to see its location. You can also use the search function at the top of the screen to view only vehicles of interest:

The search function considers make, model, year, etc. Simply enter all or parts of what you are interested in and the list will update automatically.
Any time a vehicle is moved, assuming that you also use the QR Stickers to track vehicle location, simply open the app and activescan the QR after parking the vehicle. This will ensure that after a vehicle moves our system is informed of the new location. Please also see the instructions on the activescan process for updating the location associated with a QR in this FAQ.
We call this process “activescan”. Activescanning is easily performed via the goIDit app.
Once logged in you can find a button for the activescan feature on the main screen of the app:
You can also access it via the Profile -> Utilities page.
Once you entered activescan, if you want to utilize QRs please click the Scan Asset QR button at the bottom left of the screen to scan the QR you want to update.
The app automatically updates the QR’s location to your phone or tablet’s current location. After completing an activescan using the QR scanner successfully, the app will once again engage the QR scanner to indicate that it is ready to proceed with the scan of the next QR.
Scan each QR sticker you want to update and activescan will take care of the rest.
First of all, you need to have our app installed:
Our app can be downloaded from the iOS App Store or the Google Play Store. Find the links to the corresponding app stores below:
Next, you need to log into the app. From there, you can easily reach the onboarding screen using the onboarding button next to the Search bar on the Inventory tab. The button appears as follows:
On the onboarding page you first select the vehicle to onboard. This can be accomplished via VIN or Stock#. The VIN can be manually entered, selected from the list of vehicles that are automatically imported into goIDit from your dealership, or by using the camera to perform Optical Character Recognition (OCR) of the VIN found, for example, on the vehicle sticker on the driver door frame or visible through the windshield. For most vehicles the door frame sticker is the better option for VIN OCR.
Once a vehicle is selected a new screen will appear where the onboarder can enter or edit vehicle information such as make, model, year, color, etc.
At the bottom of this page the user can also find the area for onboarding a QR code. Click the button to scan the QR. It will then be added to the vehicle.
Complete the process using the Save button at the bottom of the screen. All vehicle changes will be communicated to our service and onboarding is completed.
For most regular user accounts the answer is yes!
But there are specific user roles that are only permitted to use either the app or the web portal. If you encounter any difficulties logging in, please contact your supervisor or goIDit support.
Only administrators are allowed to change a user’s assigned user role. If you feel that you should have been assigned a different user role, please contact your supervisor or goIDit support.
Any change to a user’s role requires that the user log out and log back into the app in order for the new role to take effect within the app. Similarly, if you are using our web portal, you will also need to log out and log back in, in order for the change to become active.
The goIDit service is provisioned to support a number of different user roles. These user roles were created specifically to match each user’s responsibilities at the dealership.
Only administrators can update a user’s role. If you believe you should have been assigned a different user role, please contact your supervisor or goIDit support. Once the user role has been changed you will need to log out of the app and log back in to activate the new role.
On the login screen you will find an option to allow you to recover your password. To start click, click on Forgot Password below the Login button. It will ask you to enter your account email address (please use the email with which you would log into our app) to request a reset code. Once you receive the reset code in your email, enter it into the field on the screen and proceed with the reset process. Please contact us if you encounter any difficulties with this process.
After installing the app, you can open it and login into our services, if you were assigned login information. If you are a public user, feel free to directly use our public services, accessible via the app’s homescreen.
If you work at a dealership and did not receive login information, please contact your supervisor or goIDit support.
During the login process you will be prompted to approve several permission requests. Please do so. These permissions are needed to properly run the app on your device.
Our app is provided for both Android and iOS devices.
Android users require at minimum a device with Android Marshmallow (Android 6), but we recommend devices running Android 10 or newer.
For iOS we require a minimum of iOS 10. We support both phones and tablets.
You can download our app by following the links below:
Onboarding (4)
In most cases, simply remove the QR sticker and you are done. goIDit regularly syncs with your inventory information and will automatically detect that the vehicle is no longer in your inventory. No additional steps needed!
For virtually all goIDit customers, onboarding a QR and placing it on a vehicle is all that is required.
When the onboard completes, it also associates the new QR with the current location of the device used to perform the onboarding. Please make sure to conduct the onboard process next to the vehicle to ensure that a correct initial location is assigned to the vehicle.
Our cloud service will automatically associate the VDP for this vehicle with the QR. No additional actions required!
goIDit recommends that QR Stickers are placed near your existing window stickers.
Today, customers are familiar with the process of reviewing a window sticker to see details and MSRP. They’ll be thrilled to have the option to view online pricing, additional details, and engage with your staff simply by utilizing the goIDit Consumer Engagement – QR Code Solution.
You can also contact our sales team via email at contact@goidit.com or by calling our sales team at 402-253-0077.
Please reach out to our team to discuss a solution that best fits your needs. We are here to help!
Follow the instructions for onboarding stickers to vehicles. Your dealership inventory should already be available in our system to simplify the onboarding process.
Onboarding itself is a simple and straightforward process. It basically involves linking each sticker to the corresponding vehicle and then affixing the sticker to that vehicle.
Location (3)
If you have not already done so, please first install our app.
Our app can be downloaded from the iOS App Store or the Google Play Store. Find the links to the corresponding app stores below:
If you are a shopper visiting a goIDit-enabled dealership:
The goIDit app features a public component that allows you to easily browse a dealership’s inventory and find vehicles you are interested in. After opening the app, simply click the “Explore Inventory” button. The app will utilize your location to determine which dealership you are currently at and then load the inventory.
From the inventory screen you can select a vehicle from the list to see its location. You can also use the search function at the top of the screen to view only vehicles of interest. The search function considers make, model, year, etc. Simply enter all or parts of what you are interested in and the list will update automatically.
If you have a login to goIDit:
Login to the goIDit app. The primary screen you will see after the login completes is the Inventory page.
From the inventory screen you can select a vehicle from the list to see its location. You can also use the search function at the top of the screen to view only vehicles of interest:

The search function considers make, model, year, etc. Simply enter all or parts of what you are interested in and the list will update automatically.
Any time a vehicle is moved, assuming that you also use the QR Stickers to track vehicle location, simply open the app and activescan the QR after parking the vehicle. This will ensure that after a vehicle moves our system is informed of the new location. Please also see the instructions on the activescan process for updating the location associated with a QR in this FAQ.
We call this process “activescan”. Activescanning is easily performed via the goIDit app.
Once logged in you can find a button for the activescan feature on the main screen of the app:
You can also access it via the Profile -> Utilities page.
Once you entered activescan, if you want to utilize QRs please click the Scan Asset QR button at the bottom left of the screen to scan the QR you want to update.
The app automatically updates the QR’s location to your phone or tablet’s current location. After completing an activescan using the QR scanner successfully, the app will once again engage the QR scanner to indicate that it is ready to proceed with the scan of the next QR.
Scan each QR sticker you want to update and activescan will take care of the rest.
Still got Questions? No Problem! Use the form below to get in touch with us!
Don’t like a web form? You can also reach us by phone or email:


